Transforming an unfinished basement into a functional and inviting space is a rewarding project that can significantly enhance your home. By taking on the challenge yourself, you can tailor every element to meet your needs and style preferences. The key to successfully finishing a basement lies in careful planning, preparation, and execution. With the right approach, your basement can become a valuable extension of your living area.
Starting with a well-thought-out design plan sets the foundation for a successful project. Consider the layout, the purpose of the space, and any necessary permits before diving into construction. Essential steps include managing moisture levels, insulating walls, and building a solid framework to ensure your basement is comfortable and durable.
As you move forward, integrating electrical and plumbing systems is crucial for functionality. Finishing touches, like flooring and paint, will bring your vision to life, transforming an unfinished area into a welcoming part of your home. Whether you’re adding a family room, a home office, or a guest suite, each step you take brings you closer to achieving your dream basement.
 When finishing a basement, building the framework involves careful planning and precision. Consider space for insulation and utilities while ensuring structural stability. Framing, ceiling supports, and accommodating existing ductwork are crucial steps.
 When finalizing your basement project, it’s crucial to focus on elements that will enhance both the functionality and aesthetics of the space. These components include installing durable drywall, selecting suitable flooring, and addressing ceiling solutions that enhance the overall ambiance.
Key Takeaways
- Planning is crucial for a successful basement transformation.
- Preparation includes addressing moisture and framing the space.
- Complete the project by adding essential systems and finishes.

Planning and Design
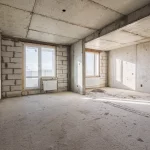
Transforming an unfinished basement into a functional family room or game room involves careful planning and adherence to building codes. Start with a detailed evaluation of your space, focusing on structural aspects and moisture control. Consider the design elements for your intended use, and ensure comprehensive planning for utilities like plumbing and electricity.Evaluating Your Basement
Before any work begins, evaluate the existing condition of your basement. Check the foundation walls for cracks or signs of water leakage. Conduct a radon test to ensure safety, as radon gas is common in lower areas like basements. Moisture is a significant concern. Installing a moisture barrier can alleviate future problems, protecting against mold and structural damage. It’s crucial to ensure that your basement is bone dry before proceeding with any renovation work.Designing Your Space
Design the layout based on how you intend to use the basement. Whether transforming it into a family room or a game room, creating a practical floor plan is essential. Sketch your plan, considering elements like wall placement and furniture arrangement. Factor in storage solutions, particularly in smaller spaces. Use furniture that provides additional functionality, such as inbuilt shelves or cabinets. Think creatively to maximize the usability of your space while ensuring it feels open and welcoming.Planning for Utilities
Utilities are a core element of basement renovations. Plan for electrical wiring, ensuring it meets local building codes and is sufficient for your needs. This includes installing adequate lighting and power outlets. If installing a bathroom or kitchenette, you must plan for plumbing work. Careful placement and design of utility elements can minimize costs and maximize efficiency. Consider future needs for any technology or equipment that may require specific utility setups. This foresight ensures your basement remains functional and valuable.Preparation Steps
Ensuring a dry and safe environment before starting your basement project is crucial. Focus on mitigating moisture and preventing mold to create a basement that stands the test of time.Addressing Moisture and Flooding
Waterproofing is your first line of defense against moisture and flooding. Apply a moisture barrier or a vapor barrier on your basement walls and floors to block moisture seepage. Inspect the area for cracks and seal them properly to prevent any water intrusion. Consider installing a sump pump to actively divert water away from your basement, particularly in flood-prone areas. Ensure that the pump is properly maintained and functional. A dehumidifier can also be beneficial to manage humidity levels and further curb moisture inside the basement.Mold Prevention
Preventing mold growth requires proactive measures. Start with a thorough inspection of your basement for signs of moisture accumulation and damp areas, as these are prime mold breeding grounds. A vapor barrier can inhibit mold by limiting moisture. Implement a routine to run a dehumidifier to lower humidity levels. Ensure adequate ventilation, particularly in areas prone to dampness. Regularly check and clean ventilation outlets to maintain proper air circulation. Additionally, address any underlying issues such as leaks or flooding sources promptly. Consider applying a mold-resistant paint to the walls for an added layer of protection. Monitoring the basement environment diligently can significantly reduce the likelihood of mold development.Building the Framework
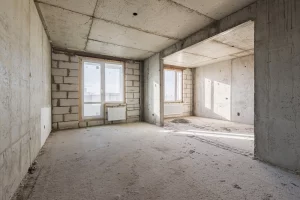
When finishing a basement, building the framework involves careful planning and precision. Consider space for insulation and utilities while ensuring structural stability. Framing, ceiling supports, and accommodating existing ductwork are crucial steps.
Framing the Walls
Begin by measuring the perimeter of your basement to determine the required length of the walls. Use 2x4s to build the wall frames, spacing the studs typically 16 inches on center to provide solid support. Cutting and assembling the studs on the floor before lifting them into place can simplify the process. Secure the bottom plate to the basement floor using concrete fasteners. Ensure that the top plate is level and properly aligned with the ceiling joists. By doing so, you provide a sturdy base for attaching drywall. Consider adding fire blocks between the studs to comply with building codes and enhance safety.Installing Ceiling Supports
The basement ceiling often needs additional support structures. A drop ceiling provides versatility, allowing easy access to ductwork and electrical systems. Installing ceiling joists is another option, supporting any overhead materials securely. You start by measuring from the basement floor to the desired ceiling height. With a drop ceiling, use a laser level or string line to ensure the ceiling track is level. Securely anchor the grid system to the walls, ensuring stability. If using ceiling joists, nail them directly into the existing ceiling framing, maintaining consistent spacing to ensure even support.Ductwork and Soffits
Existing ductwork in your basement ceiling may require soffits for coverage. Soffits are boxed structures that conceal pipes and ducts without sacrificing access. Construct these using 2x4s to frame out a box that encloses the ductwork, attaching drywall for a clean finish. Plan the soffit layout to preserve headroom and avoid obstructing essential pathways. Insulating the soffits can reduce noise from the HVAC system, improving overall comfort. Integrate any utilities, such as electrical conduits or water pipes, within these structures for a seamless appearance. By carefully designing the soffits, you enhance both the function and aesthetics of your finished basement.Electrical and Plumbing Systems
Before finishing your basement, addressing electrical and plumbing systems is essential. Properly integrating these elements can transform the space into a functional, safe, and efficient area.Running Electrical Wiring
When running electrical wiring, planning is crucial. Determine the number of outlets and lighting fixtures needed along your basement walls. Use a dedicated circuit for larger appliances or specific areas like a workshop. It’s important to install wiring before putting up drywall. Make sure all electrical installations comply with local codes and obtain the necessary permits. Install access panels for breaker boxes and subpanels to ensure safe and easy access. Use proper wire sizes for your electrical needs and ensure you have sufficient HVAC provisions to handle additional electrical loads. Consulting a professional may be necessary if you are inexperienced.Plumbing Installation
For plumbing, start by laying out where you need water supply and drainage. Whether adding a bathroom or a kitchenette, ensure pipes run through accessible areas and are properly sealed. Consider using PEX tubing for flexibility and ease of installation. Install access panels at key points to allow for maintenance and repairs. Make sure venting is handled appropriately to prevent sewer gases from entering the basement. Before installing plumbing, check local building codes for additional requirements. If modifications to existing systems are necessary, consult with a certified plumber to avoid potential issues.Finishing Touches
When finalizing your basement project, it’s crucial to focus on elements that will enhance both the functionality and aesthetics of the space. These components include installing durable drywall, selecting suitable flooring, and addressing ceiling solutions that enhance the overall ambiance.
Installing Drywall
Installing drywall is a foundational step in finishing your basement. Choose moisture-resistant drywall since basements are prone to humidity and potential mold issues. Before installation, ensure the basement is properly insulated to aid in temperature control and energy efficiency. Start by hanging drywall sheets horizontally from the top down, securing them with drywall screws. Once in place, apply joint tape and compound to seal the seams. Sand the surface to a smooth finish after the compound dries. This technique ensures a seamless look, crucial for both aesthetics and preparation for painting or other wall treatments.Flooring Options
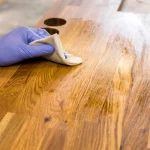
Selecting the right basement flooring involves balancing style and durability. Vinyl flooring is a popular choice due to its water-resistant properties, essential in a space where moisture can be a concern. Other options like tile and engineered wood can also be good choices, especially when installed over a moisture barrier. Consider your basement’s purpose to guide your choice; for instance, carpet can offer warmth in a play area but might not be ideal if the basement is prone to dampness. Use a vapor barrier beneath the flooring to prevent moisture issues and prolong the life of your chosen floor covering.Ceiling Solutions
Addressing basement ceiling choices involves considering both style and practicality. Drop ceilings are effective if you need access to plumbing or electrical systems, and they work well with low ceiling heights. Paint the ceiling a light color to create an illusion of height. For a more finished look, track lighting can add depth and enhance the space’s ambiance. If you prefer a more traditional ceiling, consider gypsum board, ensuring you maintain the required clearance for fixtures and ease of access to essential systems. A well-designed ceiling adds significantly to the overall feel of the finished basement space.Frequently Asked Questions
Finishing a basement yourself involves planning, budgeting, and technical skills. Consider methods to minimize costs, necessary steps to start the project, and wall finishing options. Evaluating the entire process allows you to undertake this project, even on a limited budget.What are cost-effective methods for finishing a basement?
You can save by choosing affordable materials such as drywall and vinyl flooring. Reusing materials and performing tasks like painting and flooring installation yourself can further reduce expenses.What steps should be taken to begin finishing a basement on your own?
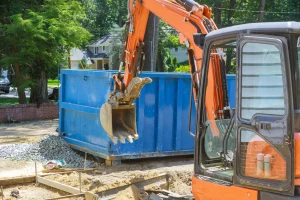
Start by planning the layout and obtaining necessary permits. Make sure you reserve a residential dumpster rental early, as this type of project can create a lot of waste. Address any dampness issues and gather tools and materials. Begin with framing and insulation, addressing any plumbing or electrical needs.What are some important considerations when finishing basement walls?
Ensure walls are insulated properly to keep the space warm and reduce energy costs. Use moisture-resistant materials and adjust your plans around existing valves, pipes, or ducts to avoid complications.Can you provide an estimated cost range for finishing a 1500 sq ft basement?
The cost of finishing a 1500 sq ft basement can vary significantly based on materials and labor. A basic finish might range from $30,000 to $50,000, while high-end finishes could rise to $75,000 or more.What are innovative ideas for finishing a basement with a limited budget?
Consider using open shelving for storage and repurposing furniture from other parts of the home. Painting concrete floors or choosing reclaimed wood as an accent can add creativity without high costs.Is it feasible for a homeowner to finish their basement without professional help?
Yes, with careful planning and willingness to research skills, homeowners can finish their basements. Many aspects, like painting and simple carpentry, are manageable without professional assistance.RECENT BLOGS

Date: March 06, 2025

Date: March 05, 2025

Date: February 26, 2025
Our Reviews


LATEST BLOGS